Installation guide for Diamond Car Wraps
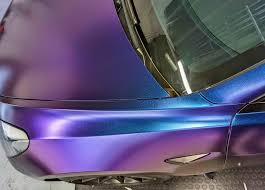
Diamond Car Wraps are a fantastic way to give your vehicle a sleek, high-end appearance while protecting its original paintwork. If you're considering installing one yourself, it's important to follow the proper steps to ensure a flawless finish. Here's a concise guide to help you through the process.
Tools and Materials You'll Need:
- Diamond car wrap film
- Squeegee
- Heat gun or hair dryer
- Measuring tape
- Utility knife
- Cleaning solution (isopropyl alcohol recommended)
- Microfiber cloth
- Gloves (optional but recommended)
Step 1: Prepare Your Workspace
Choose a clean, dust-free environment to work in. A garage or enclosed space is ideal, as it minimizes the risk of debris getting under the wrap. Ensure good lighting so you can spot imperfections during installation.
Step 2: Clean the Vehicle Surface
Thoroughly wash your car to remove any dirt, grease, or debris. After washing, wipe down the surface with isopropyl alcohol and a microfiber cloth to ensure it's completely clean and smooth. Any residue left behind can cause bubbles or uneven application.
Step 3: Measure and Cut the Wrap
Measure each section of your vehicle that you plan to wrap. Add a few extra inches to your measurements to allow for trimming and adjustments. Using these measurements, cut the diamond wrap film into manageable sections.
Step 4: Apply the Wrap
Peel off the backing of the film and carefully position it on the car's surface. Start with flat areas like the hood or doors before moving on to more complex curves. Use a squeegee to press the wrap onto the surface, working from the center outward to remove air bubbles.
Step 5: Heat and Stretch
For curved or uneven surfaces, use a heat gun or hair dryer to make the wrap more pliable. Gently stretch the film to conform to the shape of the car, ensuring a smooth fit. Be cautious not to overheat or overstretch, as this can damage the material.
Step 6: Trim Excess Material
Once the wrap is securely in place, use a utility knife to trim any excess material along edges and seams. Take your time to achieve clean, precise cuts for a professional finish.
Step 7: Final Touches
Go over the entire wrap with a heat gun to ensure proper adhesion and eliminate any remaining wrinkles or bubbles. Use the squeegee for final smoothing. Allow the wrap to set for 24–48 hours before washing or exposing it to extreme conditions.(Nas Car Wraps)
Maintenance Tips:
- Avoid using abrasive cleaners or tools on your wrapped vehicle.
- Hand wash with mild soap and water.
- Inspect regularly for any lifting edges or damage.
By following these steps, you can transform your car with a stunning diamond wrap that enhances its aesthetic appeal while providing long-lasting protection. With patience and attention to detail, you'll achieve a professional-grade result!
inside
the
car